Wednesday, February 27, 2013

Dealing with Photos

I knew it was coming and I procrastinated:  my father's birthday is tomorrow and he adores and expects a photo calendar of our family.  What this means is that I upload all of the prior's years photos to Shutterfly (ideally I would do this monthly), and then I have the photos to select from to make a new calendar.  I've done this for several years now and it really is the perfect gift for loved ones who have everything.

Sunday afternoon, February 2012. 

But. 

I had to force myself through an entire year of photos.  While this could be inspiring, entertaining, and nostalgic, today it was sheer slog; some months had 300 photos before I went through with a razor-sharp click-and-delete.  The sun was shining, and I would have rather worked on the binding of Ben's quilt. 


No-bake Cheerios cookies - March 2012.  They were delicious.  I should make them again and blog about them this time.
 But.

I love my dad and he doesn't ask for much. . . except for the cherry pie and peach pie ("I want crumbs on top") that I baked tonight, too! 

I hope I'm more generous than I sound here.  I think the main thing I've thought all day was:  isn't modern life awful in the overabundance of photos from every angle of every activity? What's so terrible about having 20 photos total of an entire childhood?  They would be precious photos, indeed.

Never blogged about the failed marshmallow and coffee mousse.  May 2012

Ironically, this is also the day the children and I ran by the library where my book on digital photography had come in.  I'm not going to stop photographing things, but I'm rather sick of photos after today.  There's a lesson in something here somewhere and I'll just have to figure it out later.

Monday, February 25, 2013

Embroidery Floss Storage

All my embroidery floss, needles, and darning egg were jumbled in a tin.  Ridiculous.  Rebecca's family all keeps theirs in flannel rolls, so I made one for myself.  You can see I don't have a large collection and I don't really have embroidery projects, just mending and darning jags.

I added a pocket for the darning egg and a packet of needles.  The inside of the roll is flannel and the outside is from this dress. The dress was the wrong color for me and the wrong fit for me and a few friends, but I loved the quirky fabric, so I kept it for its fabric and nice metal zipper.


How do you store your embroidery floss?

Sunday, February 24, 2013

Sunday Dinner: British Colonial

Menu:
dhal

curried eggs
brown basmati rice
garnishes: chopped cilantro, lime wedges, golden raisins, hot lemon pickle, plain yogurt
banoffee pie (recipe below)


Saturday:
make dhal - no need to refrigerate
hardboil eggs - have a child peel them and keep in fridge
thaw graham cracker crust - keep tightly bagged on counter

Sunday morning:
make tomato sauce part of curried eggs - allow to sit on stove next to dhal
put basmati rice in oven on timed bake
put bowl and beaters in freezer for whipped cream


Sunday noon:
reheat dhal
add eggs to tomato sauce and heat
chop cilantro and limes
whip cream
assemble pie
set table


Banoffee Pie
[ban OFF ee]

This is a British pie.  I got the recipe from Pam Anderson, but I tweaked it a bit.  I made two of these to take to dinner with friends and made a third one today to use up the final jar of dulce de leche in the fridge.  It's a rather chilly pie for winter, but making dulce de leche was a kitchen project I could not pass up; the resulting pie is terribly delicious, I must say.

1. Make dulce de leche (caramelized sweetened condensed milk, beloved of Latin America):

Open 14-oz. can of sweetened condensed milk.  Scrape it all into a canning glass pint jar or 2 half-pint jars.  Put on the lid and screw on the ring.  Place in saucepan with water to cover the lid by an inch (or put it in the crockpot with water to cover - my crockpot wasn't deep enough, so I used the stove method).  Bring to a simmer with the lid on and keep at a simmer for 2-3 hours, until milk has turned a deep tan.  Allow to cool before opening - either carefully take the hot jar out of the hot water or else let the whole business cool down. This is now dulce de leche.  It will keep for several weeks in the fridge.

2. Make a graham cracker crust:

Combine:
1 1/3 cup graham cracker crumbs
2 Tbsp. sugar
1/4 cup melted butter
1/4 tsp. freshly grated nutmeg
1/4 tsp. salt

Press into 9" pie plate to form crust.  Bake at 375 for 8 minutes.  Cool completely (can be made ahead of time and tightly bagged and frozen or kept at room temperature for several days).

3. Assemble pie.

Spread about 2/3 (about a half-pint) of the dulce de leche in graham cracker crust (or use the whole thing and fewer bananas).  This is tricky to spread thick glop on a crumby crust.  The crumbs that got mixed into the dulce de leche didn't bother us, but you could warm the dulce de leche slightly to make it more spreadable. 

Slice over top:  2-3 ripe bananas

Whip in chilled bowl with chilled beaters:  1 cup heavy whipping cream.  As it is taking shape, sprinkle in gradually 2 Tbsp. sugar and 1/2 tsp. vanilla extract. 

Spread whipped cream over bananas.  Chop up some semisweet or bittersweet chocolate to equal 1/2 cup.  Sprinkle artistically on top of the whipped cream. 


Serve immediately or chill for a few hours.  The pie loses its loveliness after that and weepy liquid will appear in the bottom - but don't despair, the flavor is still there!  The sugar stabilizes the cream well enough that it will be fine the next day.

Thursday, February 21, 2013

I Put My Pearls in a Seashell

My dear children are forever giving me things.  It is so so generous and endearing, but what on earth do I do with them all?

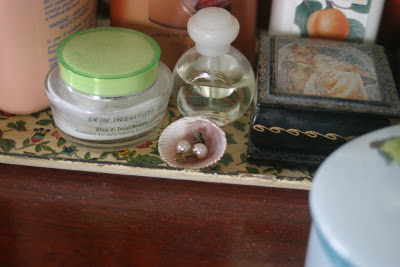
Here is a seashell that Genevieve picked up at the beach and played with for a while.  One evening she arranged a "show" for my husband and me, and in her charming logic, there were prizes at the end of the show. This seashell was one of my prizes.


I put my pearls in it on my dresser tray.  These are cultured pearls I bought for myself when I was 18 and newly pierced.  Originally they were quite expensive, but I bought them for 80%-off because the jewelry store was going out of business.  I wore them to the pearl party and told the story of how I talked my dad into ripping up my bedroom floor for me because I thought one had gone down a crack; I found it just in time, thank goodness.  I treasure my pearls.

The pearls snuggled in the seashell make me happy.  But boy, you can see the dust on the photo.  I didn't do my Friday cleaning last week because I was reserving all my returning strength for the pink paint.  Tomorrow, it will be clean!

Wednesday, February 20, 2013

A Spate of Patching

Recently, three patches that please me:

1.  Here is the Pendleton wool blanket that guards the back of a sofa. It is dearly loved, but old and frail which is why it was rent when Ben tried to pick it up while standing on it. I used a piece of wool from Rebecca and handstitched it on.  I am having a little crush on red stitching on dark backgrounds right now. 


2.  A hole in a nice linen tea towel.  I'm afraid the linen is getting so worn that the satin stitch around the patch may separate it into another hole, but in the meantime, I like the little hit of color.

It's terribly cold and windy, a good day to hang out whites!


3.  A mysterious hole in the bedroom laundry hamper got a French-blue patch. 

Incidentally, I'm so pleased with my latest laundry hamper organization:  I hang the pre-wash spray right there on the hamper so we can squirt stubborn stains when we are thinking, "oh, this shirt got ketchup on it, I need to put it in the wash" rather than when I am sorting frenetically in the laundry room and can't be bothered to look closely at each item for stains.  I also tied a little mesh bag onto the hamper, too, and put handwash items in there so they don't get swept up in the (as I said) frenetic sort-and-dump into the machine.


And here's a bonus: I decorated my plain black mittens with patches as I watched the last episode of Downton Abbey. It's scraps of felted wool and that red handstitching. The result is a little more ragamuffin-y than my usual style, but until another inspiration hits me, I'm keeping them.


Monday, February 18, 2013

The Heart of the Matter

We kept Valentine's Day super-simple this year.  Genevieve was required to give a valentine to each child in her class, and Ben's was optional, but he wanted to join in, so he made valentines for each of his classmates, too.


I bought heart stickers for them.  Then I dug out plain cards and envelopes that I already had.  We helped Ben write the name of each classmate and his name on each card.  He put on a sticker and decorated it with colored pencils a bit.  That was it.


Genevieve made hers a little fancier because she's older and has skills, but still, both children completed their valentines largely by themselves.  One child thought it was fun for about two cards and then whined and complained the rest of the way, but I forced that child to finish the project because I think it's important to learn how to finish things.  Plus, I wasn't going to go out and buy cards, nor did I want to spend the time doing a Pinterest-cuteness project.  I want my children to focus on the point of the special day:  giving a little of themselves to their friends in a special note.

 
And even though I was sick on Valentine's Day, it didn't really ruin any plans; I don't know, my husband and I just play it differently each year depending on our mood. 

This year, I hid a bag of chips from him a few weeks ago because I eat snacks more slowly than he does and I didn't want to share.  He laughed uproariously when he was fixing something and found them. I was very embarrassed, as I had never hidden things from him before. 

Just before Valentine's Day, he put a big box wrapped in comics and a bow on the table for me.  It was a three-pound bag of chips.  Yes, three pounds. That man.  He sure knows the way to my heart! And the funny thing is, I want to share these chips because I can just imagine how fat I'd get if I hoarded all three pounds for myself!

How was your Valentine's Day this year?  Fancy?  Low-key like mine?

Sunday, February 17, 2013

We Have Achieved a Pink Living Room

Well, the flu did get me, and then we painted our living room pink.  It's nice to be back on the blog!


Around the time Genevieve was born, we painted the living room a mushroom color, which I chose because it was between brown and gray and might go with anything.  It did look nice with the creamy trim and the stone fireplace.  My  husband and I figured we'd get a vision for the living room sooner or later.

Then we got our twin red sofas and I sewed chartreuse drapes.  The mushroom walls did not assist the aura of the room, you know?  We wanted a wall color that played nicely with the drapes and kept the focus on the red sofas.  Pink!  Very pale pink, like the inside a seashell.


My husband and I, with help from friends and family, have done all our own painting over the years on our fixer-upper.  We save our home-repair dollars for the projects we don't have the expertise for.

But there was a lot of choreographing to get this room painted, let me tell you.  We arranged babysitting part of the time.  I made sure the freezer was stocked with easy food to keep our morale up and dinner for our Sunday guests.  I made a list of every task that needed to be done, what day it needed to be done on, and possibly how long that task might take.  The idea was to have the children around as little wet paint as possible, and to have the room torn apart for 2 days only.


We did it.

We're exhausted. 

The living room looks fabulous. 

But I must say, as we applied the first coat of paint (Benjamin Moore's "Gentle Blush"), the living room looked scarily pink, like a little girl's nursery. We were dismayed, but we painted doggedly on and reminded ourselves how rigorously we had chosen our color. Amazingly enough, once the dropcloths were put away and the furniture and drapes were back in place, the pink settled down into the background where we wanted it.


We were only planning to touch up the trim, but our standard trim color (Benjamin Moore's Navajo White) suddenly looked sickly green next to the pink; we wanted creamy white.  So I made an emergency trip to our paint store, got their expert help, and we painted the living room trim Mascarpone.  Much better.

Sunday, February 10, 2013

How the Stomach Flu Did Not Overwhelm Us

1.  The house was clean and the laundry was nearly caught up. I attribute most of my sanity to a clean house.

2.  We had several small plastic buckets that the sufferers kept in arm's reach.

3.  I had a cache of ginger-ale for just such an occasion.  I did go down to the corner store and get Gatorade (and added it to my grocery list to keep for later; because the stomach flu always finds you later).

4. There were warm rice bags for hurting tummies and cold feet. I had, on a whim, made this rice-bag heart a few days before. I had been planning to show it to you on Valentine's Day for a cute heart post.


the other side

I am so happy with how this patchwork turned out.  I love to look at it.


5.  When the sufferers were climbing out of their pit, I served them warm jasmine rice with salt in a ramekin with a tiny spoon.  Then a little applesauce.  Then an inch of banana.  And later, homemade chicken stock with kluski noodles and thyme.

6.  My husband threw away toothbrushes and washed handles, lightswitches, and bathroom with assiduous care.


It was, surprisingly, a peaceful weekend.  Or maybe that was because all our social plans were cancelled.  I had been disappointed to miss the northeastern snowstorm, but it turns out we were housebound by the stomach flu. 

Thursday, February 7, 2013

The 50-cent Tapestry

I think it was priced fifty cents because it wasn't technically finished - I think those yellow Xs are basting stitches.  There was also a spot, a tiny spot, that looked to be moth-eaten.


 But I had eyes only for the rich colors, so I brought it home.  I mean, really, fifty cents.
 

After about two years of closing the drawer wistfully on the tapestry, I bargained with my husband:  he could hang his three Roman soldiers and I could hang my tapestry.  Both of us tolerate the other's picture.  But at least mine is cheap!  I got the frame with a coupon at AC Moore for something under $5 - I think the frame gives it an elegant, minimalist edge. 

 
the soldiers
 
 
An oil painting by a local artist who is also our friend; I do clean up the mantel sometimes, but I rarely "decorate" it.
We're gearing up to paint our living room next week while the children have an overnight at Granny and Grandpa's house.  It's taken a lot of color swatches and scheduling plans to get to this point - we are so excited!

Wednesday, February 6, 2013

Growing Sprouts

I've been growing our own bean sprouts after being inspired by friends.  We invited them for dinner, and their hostess gift was a bowl of alfalfa sprouts!  That inspired me on several levels (I am always looking for easy, thoughtful hostess gifts).

I re-read the section in More With Less on sprouting.  I bought a bag of daikon radish seeds at the health food store - I wanted to get alfalfa seeds or at least a sprouting mix, but apparently everyone is sprouting seeds at this time of year and daikon radish was the only thing left.

daikon radish seeds soaking


The picture is actually of lentil sprouts.  Genevieve wanted to sprout lentils. 

 
the dark, warm place where I put them:  the cupboard above the oven hood


Here is our method:

1.  Soak 2 tbsp. of seeds or mung beans or lentils overnight in water.  Best choice are seeds marked specifically for sprouting.  I keep the extra in the freezer.

2.  In the morning, place the drained seeds in a glass jar.

3.  Cover the mouth of the jar with a piece of cheesecloth and rubber-band it in place.

4.  Place the jar on its side in a warm, dark place (a cupboard next to or over your fridge or oven or close to a heater).

5.  About three times a day, swish water through the jar, wetting all the seeds.  Drain it again and put it back in its dark spot.

6.  You'll see sprouts in a few days.  When they're a few inches long, remove the cheesecloth and rubberband and put the lid on the jar.  Keep in the fridge about a week.


So far, we've just tossed the sprouts in salads and made lunchtime sandwich melts with them (the secret to great melts under the broiler:  put thin rings of onion on TOP of the cheese so that the onion gets slightly browned and sweetens up while the cheese melts underneath). 

What do you like to do with sprouts?

Monday, February 4, 2013

A Handy Trash Bag for the Sewing Room

When I began my sewing career, I put my snipped threads and fabric trash in a little pile immediately to the right of the machine.  I never put a trashcan proper at my sewing station, and I was forever picking up little piles of threads from the floor or my children's shoulders when they leaned in to see what I was doing.

Finally, I looked on Pinterest for a solution.  I found one!  I made a little fabric can to dangle over the side of my worktable, held in place by a wide ribbon glued around a baked-potato-sized rock. Nifty,  huh?
 

The thread catchers I saw online had pin cushions to keep them in place, but I subbed in a rock because I have a pin cushion I'm devoted to (Genevieve reminded me that she picked up the rock on this blissful vacation last spring). 

I did try to sew a sleeve for the rock, but then I thought the trash can would be more portable if the rock was firmly attached to the ribbon.  I wrapped the ribbon around the rock a time or two, hot-gluing as I went.  I intend to carry the little can to the living room coffee table or dining room table when I carry my handsewing there. No more sewing snips on the floor!

Sunday, February 3, 2013

There was Ice Cream for Breakfast

Did you have ice cream for breakfast on Saturday morning? We did!  It was decadent and silly and my sister stopped by, which always makes a party.

I used the fabulous vanilla recipe that Jennifer Jo posted. I was not pleased with my yeast waffles from More With Less. I made baking-powder waffles last year, and I think that's the way to go. I also attempted to make a blueberry syrup which was too watery and nobody ate it; in fact, nobody ate any fruit of any kind at that meal. 

Friday, February 1, 2013

How to Freeze Unbaked Sticky Buns to Bake Later

Here are some helpful ways to fit a warm yeasted sweet bread (sticky buns or sweet rolls, etc.) into your life - what is better on a bitter winter morning? Start these methods before the morning of.

Method 1.  Allow dough to rise in bowl per recipe.  Once the buns are shaped, put them in their pan and pop them, covered, in the fridge overnight (I use my metal 9x13 with its metal lid, which is not airtight, but an airtight bag is fine too).  Let stand on the counter for 10-15 minutes in the morning. Bake 10 degrees warmer than the recipe originally called for OR add 5-10 minutes to the original baking time using the original baking temperature. 

Method 2. Allow dough to rise, allow shaped buns to rise to the point where you would bake them.  Then, instead, wrap the pan up tight and freeze them.  The day before you want them, put the frozen buns in their pan in the fridge for 12 or so hours.  Then, bake the same way as #1.

Isn't that handy?  I made sticky buns using method #2 on Christmas morning because there were so many festivities piled up that I couldn't bear the thought of fiddling with sticky buns on Christmas eve evening.

Sticky buns in the pan, just before baking.
Now, here is a bread-freezing trick that I tried over Christmas that did not work for me.  I parbaked French bread and froze it, so that I could bake it another day and have hot bread then.  The first time, the parbaking, I baked the loaves just until they were taking on color.  When I baked the bread a second time, it kept its doughy, underdone center no matter how long I baked it and how dark the crust was getting.  Not successful!  So, now you know.